You have no items in your shopping cart.
0
You have no items in your shopping cart.
Welcome to the Highline Anchor Analysis series of Slack Science articles. In this series I will be posting pictures of various highline anchors and analyzing them using the Highline Anchor Criteria article as a template. I will go into the Failure Mode Effect Analysis (FMEA) for each of the anchor setups as well as offer critique and suggestions for improvement on each setup. The hope is that this will give people a general idea of how to analyze a highline anchor when approaching a highline that's already rigged or that you are rigging yourself.
Please Note: This is meant as a reference only! The information in these articles is by no means comprehensive. There are a large number of variables to consider when setting up a highline and a wrong move could end with a fatal accident! Please seek professional advice or rig with someone who has a good knowledge of highline rigging before doing so on your own!
These articles are not going to go into how to build these anchors step-by-step. Rather, my intention is to show you a completed anchor and my critique on how to make it better and more safe. I may post some negative things about certain configurations. If I happen to do so about an anchor that you built, please know that I mean no offense to you, I am just trying to educate the community on proper anchoring techniques. Please take the opportunity to learn from the critique rather than being offended. If I do offend you, I'm really sorry.
If you have any questions, please feel free to leave a comment below and I will try and explain further.
This next anchor that we will be analyzing is a more traditional setup using bolts.


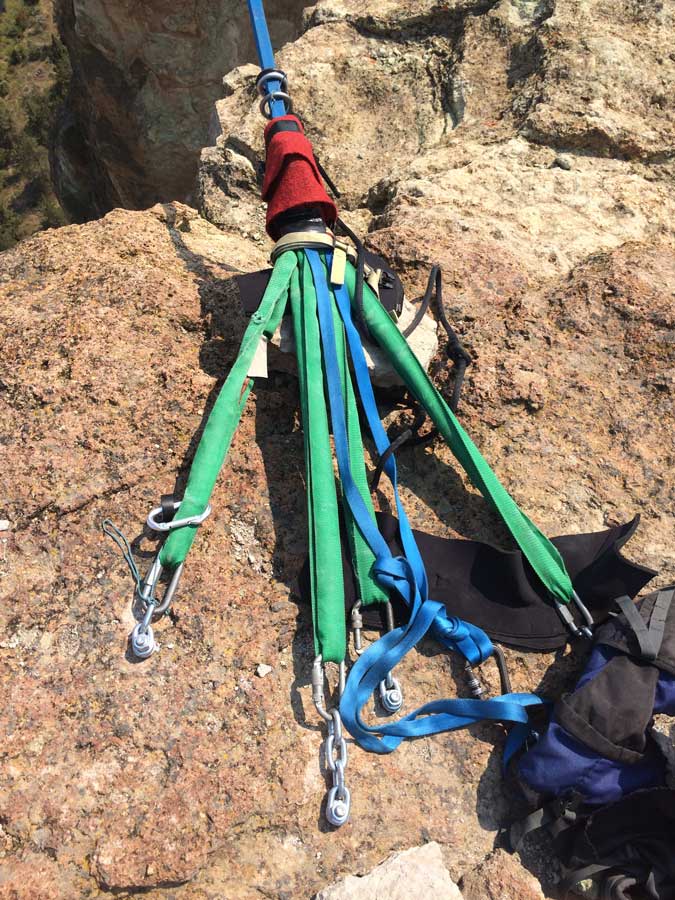
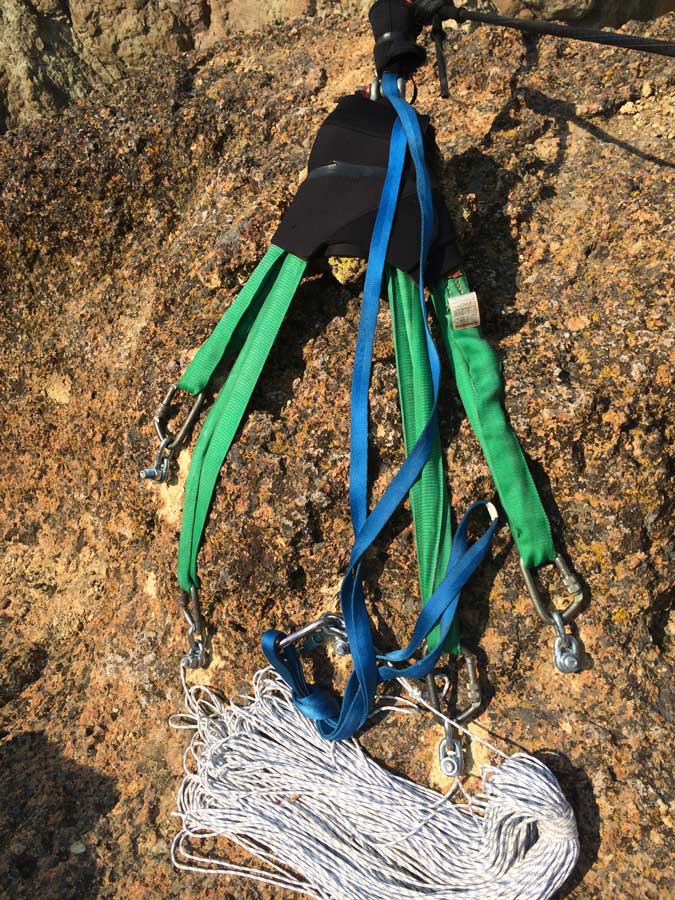
This anchor looks super simple. There are 4 wedge anchor style bolts with chainlink hangers that are equalized with a sliding-x using a Blue Spanset. The spanset legs are connected to the bolts using various steel connectors (carabiners and quicklinks). The master point of this anchor has two anchor shackles: one for the mainline and one for the backup. Each of these shackles is connected to a Slack Banana or Alpine WebLock 1.0. These webbing anchors are wrapped with some thick felt for abrasion protection. There is also a small A-frame made from a rock on one side to lift the anchor off the potential abrasion zone. Finally, the two webbing tails are backed up to a 5th bolt.
Let's run through our acronym making sure that this anchor passes the test:
Strong - This type of anchor is ridiculously strong. I've done some testing using Blue Spansets in the 4-point sliding-x and have found that they break in the realm of 270 kN! I believe that the bolts or connectors would break well before the spanset would. That being said, this style of anchor definitely passes the strength test.
No Abrasion - This anchor is fairly well protected against abrasion by the use of a small A-frame and padding around the webbing anchors. Also, by using spansets, the abrasion resistance of the anchor increases quite a bit. This is not to say that Spansets are immune to abrasion, it's just that they do better than a lot of other materials out there.
One thing to note, there is a sizable part of the line that is exposed to rock coming out of the webbing anchors that could use some protection. A simple solution would be to use a Velcro Line-Sleeve (Sidewinder Velcro Sleeves). Additional padding could be used underneath the spanset itself. If any of the anchor points were to fail and the master point were to extend, the spanset would abrade will sliding through the master point.
Redundancy - There is redundancy in the number of anchor points that are being used. There is not, however, any redundancy in the sling. Albeit, Blue spansets in a 4-point sliding-x are extremely strong, it would still be nice to have a small piece of static rope or something light backing up the spanset just in case of catastrophe.
Equalization - The load sharing between the 4 anchor points is fairly good in this type of rig. Depending on on how well the sliding-x was equalized during the rigging, it may be the case that 1-2 of the bolts are seeing higher forces than the others. My guess would be the 2 center bolts. The difference is likely very small though.
Small Angles - This setup utilizes very small angles through-out. The angle between the two outer-most bolts is in the 30-degree range, which minimizes the multiplicative force issue.
No Extension - This anchor is not protected against extension. If anything happens to any of the anchor points, you will get a ton of extension (up to about 2 feet). This will run the risk of shockloading the rest of the anchor points. However, I will say, the bulkiness of spansets will slow down the extension quite a bit, but there is still a risk of serious shockload if something happens to one of the anchor points - especially if it's during a leash fall.
This type of anchor does okay on the SNARE-SANE check. Not enough for me to be comfortable using it. I'll offer some alternatives below.
Now let's checkout what would happen if stuff started to break:
Failure Mode - Any bolt fails
This would be very very bad! If any of the bolts fail, the master point would extend until the webbing tails got tight, at which point, these tails would be holding the full force of the line! Remember, these tails are coming straight out of the webbing anchors. That means that both ends are loaded after the webbing goes through a series of bends. This is what would be holding you after a bolt breaks and you are in some gnarly leash fall...YIKES! Very easily mitigated by first tying the tails to the main and backup master shackles and then tying the tail off to a separate bolt. This would create a separate length of line going from the backup bolt to your master point shackles.
Failure Mode - Spanset Failure
This would also be an extremely catastrophic event! Those same webbing tails from above would get loaded in a very bad way. A simple way to fix this issue would be to backup the spanset using a small piece of static rope running through a number of the bolts. Or, you could use small pieces of webbing wrapped between each bolt and the master point - one for each bolt. This would prevent any extension in the event of a bolt failure or spanset failure. It would also prevent that webbing tail from getting loaded. It would only add about 1 pound to your anchoring materials too.
There are other potential failure modes, but these seem to be the ones that would be most likely to happen within the highline anchor given a catastrophic event.
Now let's talk about what I really think of this anchoring style.
This type of anchoring is extremely common in the highline community. A single spanset without any backups with the webbing tails tied off. Even though spansets are very durable and strong, it is not acceptable to use them on their own! There are so many different things that could happen that could result in a catastrophic event! There absolutely needs to be some sort of additional anchoring material to prevent any bad loading of webbing tails or complete anchor failure. It's very simple to bring a small length of static rope to run a second sliding-x or a few small lengths of webbing to backup the bolts individually to the master point. These simple extra steps could save you in the event that anything happened within the anchor.
Another downside to this anchoring technique is that it's very heavy! It requires that you bring quicklinks or other steel connectors, in addition to the heavy spansets. When you have to hike gear in to your highline area, this extra weight matters!
| Product | Price | Quantity | Options | |||||
|---|---|---|---|---|---|---|---|---|
| Features |
| Availability: |
| Price |
| Options |
| Actions |

← Older Post Newer Post →
0 comments