You have no items in your shopping cart.

An in-depth look at a 4-bolt highline anchor using static rope and dyneema. A super lightweight setup capable of extremely high forces.
Welcome to the Highline Anchor Analysis series of Slack Science articles. In this series I will be posting pictures of various highline anchors and analyzing them using the Highline Anchor Criteria article as a template. I will go into a very basic Failure Mode Effect Analysis (FMEA) for each of the anchor setups as well as offer critique and suggestions for improvement on each setup. The hope is that this will give people a general idea of how to analyze a highline anchor when approaching a highline that's already rigged or that you are rigging yourself.
Please Note: This is meant as a reference only! The information in these articles is by no means comprehensive. There are a large number of variables to consider when setting up a highline and a wrong move could end with a fatal accident! Please seek professional advice or rig with someone who has a good knowledge of highline rigging before doing so on your own!
These articles are not going to go into how to build these anchors step-by-step. Rather, my intention is to show you a completed anchor and my critique on how to make it better and more safe. I may post some negative things about certain configurations. If I happen to do so about an anchor that you built, please know that I mean no offense to you, I am just trying to educate the community on proper anchoring techniques. Please take the opportunity to learn from the critique rather than being offended. If I do offend you, I apologize in advance.
If you have any questions, please feel free to leave a comment below and I will try and explain further.
I want to start this series off with one of my own highline anchors that I rigged at the Smith Rock Highline Festival this past September (2014). It's a fairly unique anchor that has some interesting qualities that I would like to dive into.

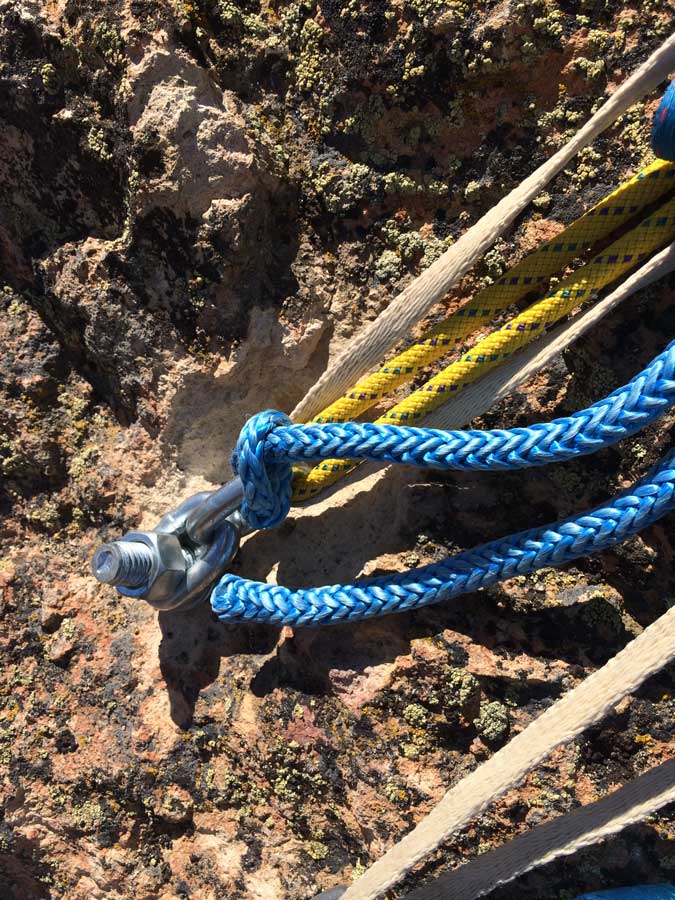
Description of the Anchor
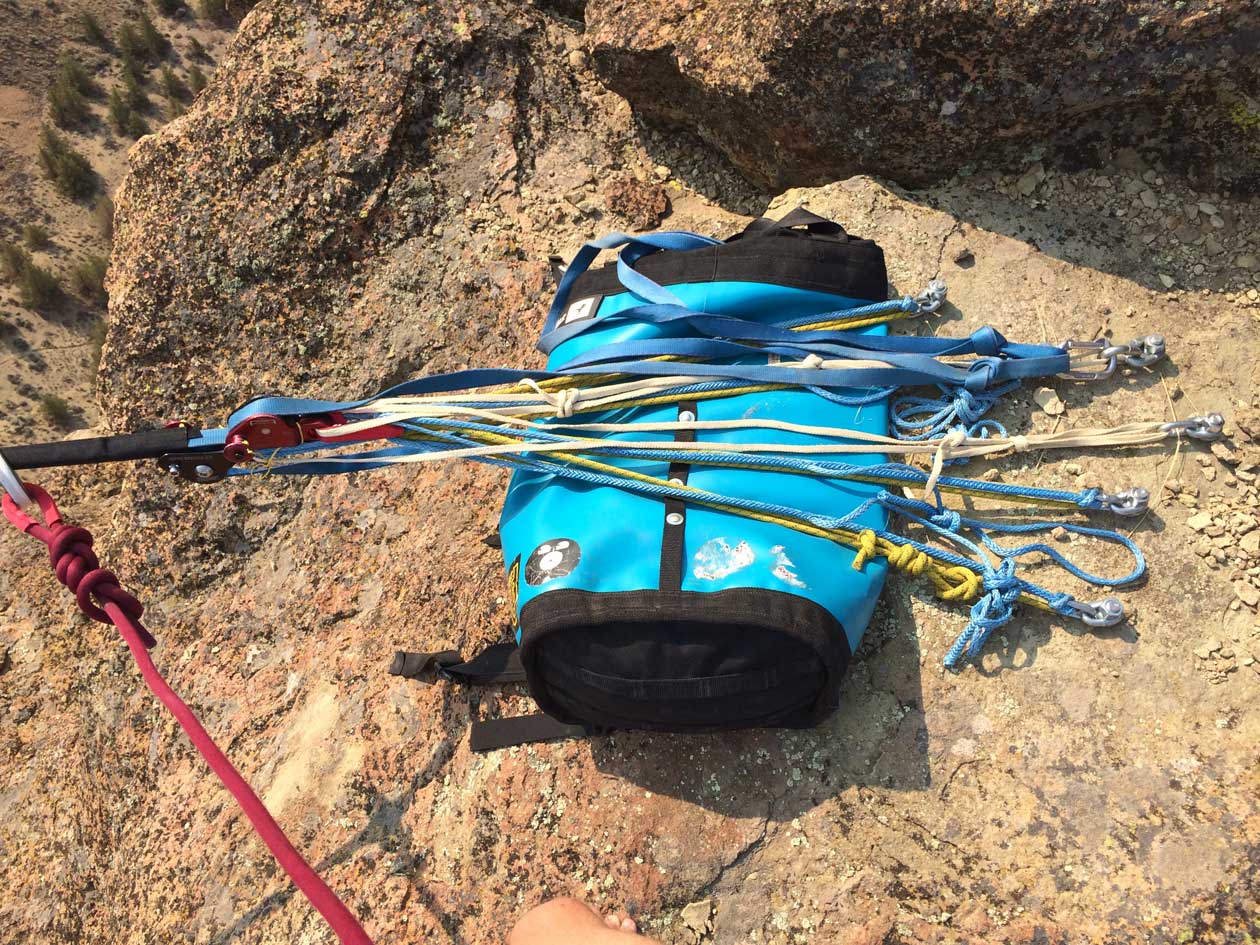
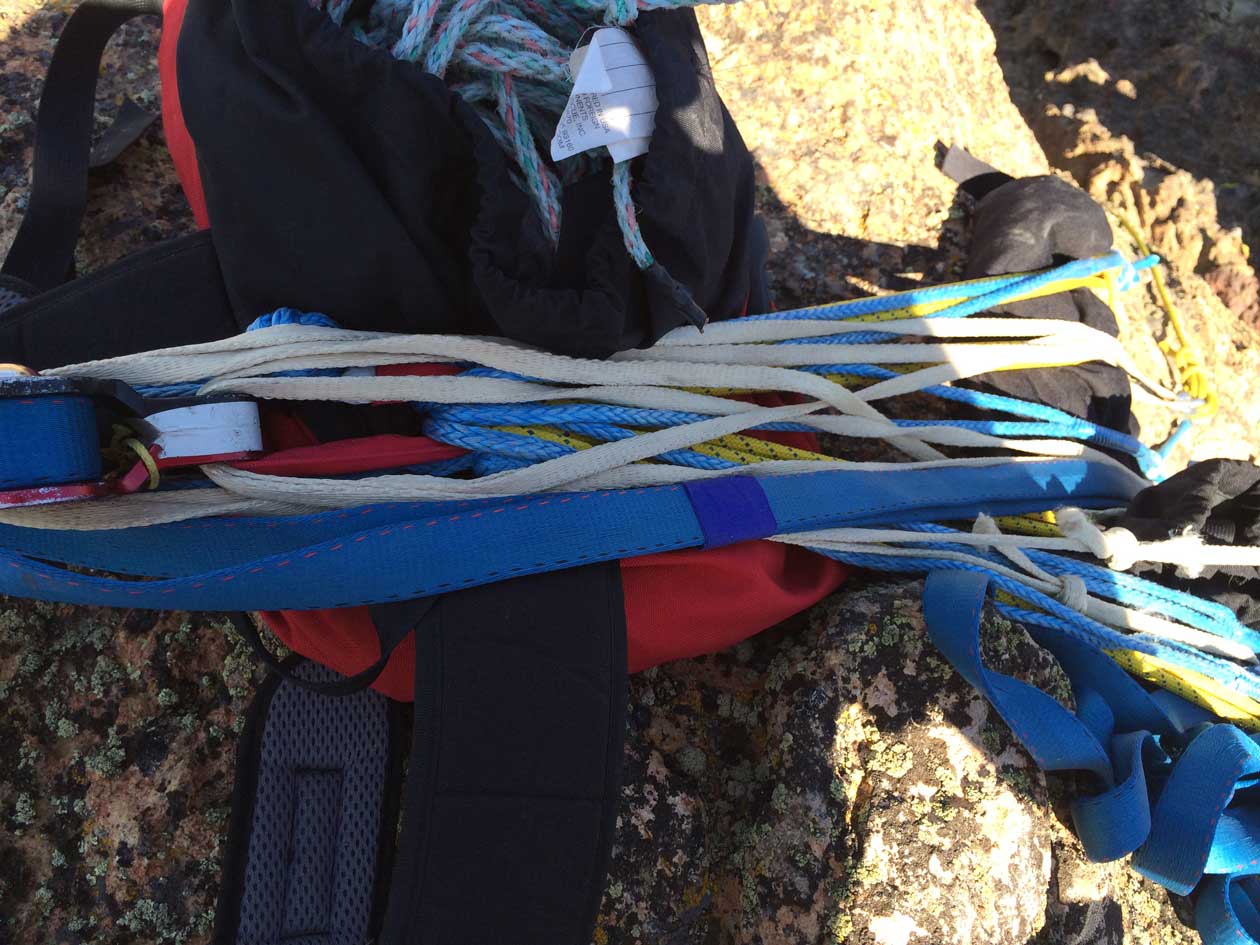
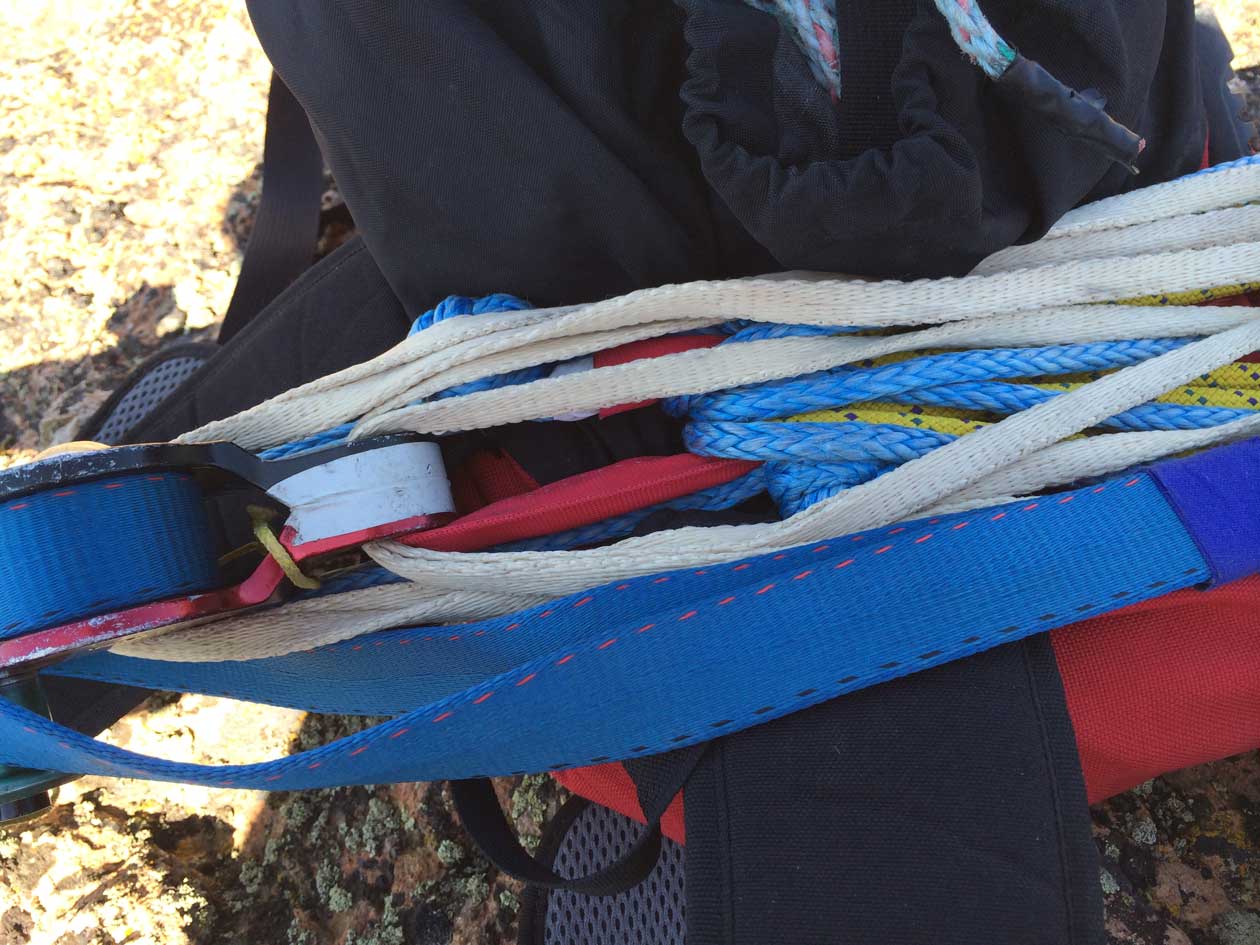
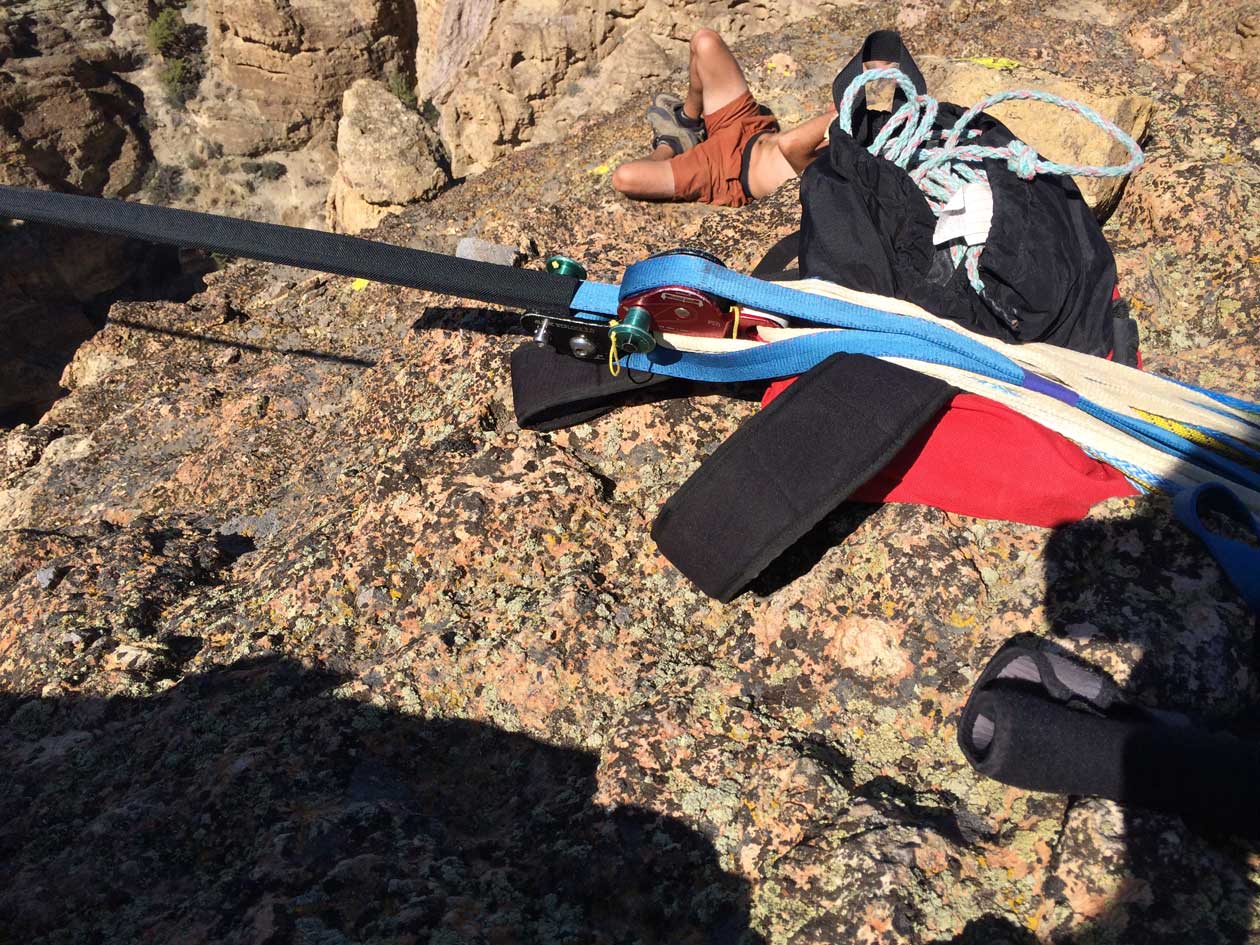
Alright, there appears to be a lot going on here, but it's really simple once it's broken down. First, the yellow rope is holding all of the tension. It is an 8mm static rope (Sterling 8mm Edge Restraint Static Rope) that is configured in a sliding-x pattern between 4 bolts. These bolts are wedge anchor bolts in solid rock with chain link hangers. The rope passes directly through the chain links and the two ends are joined together by a double-fishermans knot with stopper backup knots. The line is comprised of double Type 18 MKII that is anchored with 2 Alpine WebLock 3.0's (one for the mainline and one for the backup line per side).
At the master-point of the sliding-x is a pair of soft shackles made from 1/4" Amsteel Blue: one going to the mainline WebLock and one going to the backup line WebLock. In addition to this there are whoopie slings made from the same 1/4" Amsteel Blue that are girth-hitched to each bolt and go straight to the master-point. Each bolt has its own individual whoopie sling that is completely separate from the others. These whoopie slings are not holding any tension at the moment, but are pulled hand tight once tension is applied to the line. The yellow static rope is holding all the tension.
Then, there is a piece of 3/8" Vectran webbing going from 2 separate bolts straight to the anchor holes of each WebLock (2 pieces of Vectran - one per WebLock). They are configured in a sliding-x pattern passing straight through the chain links on the bolts and straight through the anchor hole on the WebLocks. These act as backups for the soft shackles.
Lastly, the tails of both webbings are tied off to one of the 2 bolts that the Vectran webbings are threaded through
SNARE-SANE Check
Let's run through our acronym making sure that this anchor passes the test:
-
Strong - The static rope that is holding all the tension has an MBS of 18 kN. There are 8 strands holding the tension. If we account for loss in strength due to the knot connecting the ends, plus all the bends and inefficiencies of the sliding-x, we can assume a strength of roughly 80 kN. Each whoopie sling has a strength of roughly 24 kN. We have four of them, which yields 96 kN. This isn't realistic though due to equalization issues and the fact that if we ever loaded these slings, there likely wouldn't be four of them (more later). I think it's safe to say that this anchor is strong enough to pass the strength test.
-
No Abrasion - Both anchors are protected from immediate abrasion by the use of a small a-frame utilizing a haulbag and the leader line bag. In addition to this, there is velcro sleeving extending out past where the line could ever possibly rub on the rocks. There is definitely room for more abrasion padding in this setup though. The addition of further padding around the line and raising the line slightly higher could be a benefit.
-
Redundancy - This anchor is extremely redundant. As we will see in the FMEA, there are several points of redundancy within this 6 anchor-point highline anchor. Each bolt is individually backed up by the use of whoopie slings. The soft shackles are backed up, the static rope holding the tension is backed up, and each whoopie sling is backed up. Every component within this anchor has a backup in place.
-
Equalization - With the use of a small diameter rope like the 8mm passing through chainlinks, we get very equal loading of the bolts. This was not tested in a lab environment, however, by feeling each leg of the anchor by hand, it's quite noticeable how equal the loads are between the legs. I wouldn't say that it's perfect, but it's getting pretty close to it. Having even larger diameters where the rope passes through could optimize this further, but it may not be as functional.
-
Small Angles - The largest angles in this anchor appear to be in the realm of 30-degrees, which is quite optimal. If we added the force up on all the bolts and compared it to the force on the slackline, we would not see that much of a difference (with a max around 120%). This is great!
-
No Extension - This is one of my favorite things about this anchor setup: there is almost zero extension possibility! Consider what would happen if one of the bolts failed. The remaining bolts that had whoopie slings attached to them would take the load. Since I cinched down the whoopie slings as much as I could after tension was applied and they have close to no stretch, the WebLocks would not move more than an inch or two. This is phenomenal!
Overall, I think this anchor does extremely well on the SNARE-SANE test. It could improve with the use of some abrasion protection, but other than that, it's a great highline anchor. I will talk a bit more about why I love this setup below.
Now let's checkout what would happen if stuff started to break:
Failure Mode Effect Analysis
-
Failure Mode - Yellow static rope fails
If the yellow static rope fails, then all 4 whoopie slings would get loaded and the main and backup WebLocks would shift about 1-2 inches. We may see slightly less equalization after this happens, but it wouldn't be terrible. I would guess that the majority of the force would be applied to two of the whoopie slings.
-
Failure Mode - Any of the four main bolts fail
If any of the four main highline bolts fails, then the remaining three will get loaded with the whoopie slings. The yellow static rope will no longer be holding any tension as it would require extension. We would have 3 points of redundancy through the use of the whoopie slings.
If all four bolts failed, then the Vectran webbing tied to the anchor holes of the WebLocks would get loaded, sharing the load amongst two bolts.
-
Failure Mode - Main soft shackle failure
If the main soft shackle failed, the main WebLock would extend a bit and get caught by the Vectran webbing backup. The backup line WebLock would remain still.
-
Failure Mode - Backup soft shackle failure
If the backup soft shackle failed, the backup WebLock would catch on the Vectran webbing. The mainline would be unaffected.
There are other potential failure modes, but these seem to be the ones that would be most likely to happen given a catastrophic event.
Now let's talk about what I really think of this anchoring style.
My Opinion
There is a lot of new stuff happening in this anchor for me. For one, it's the first time I have incorporated Amsteel into my anchoring. I really like how versatile it is as a rigging tool and I especially like how lightweight and strong it is! The entire anchor, including both main and backup WebLock was under 4 pounds per side! This is unreal! I am positive that this style of rigging is the way of the future for highline rigging. It's a more bomber, lighter weight, easier to rig highline anchor than anything I have seen thus far utilizing bolts.
In general, I am a huge fan of using 4 bolts on a highline. It ensures that no single bolt is holding a large percentage of the force, equalizes nicely, and doesn't require a huge amount of gear. I have been using 4 bolts as my anchors for some time now and really think it's the optimal number to use.
The only thing that this anchor could use more of is abrasion protection. Maybe some more break testing with the different Amsteel configurations. Other than that, I am very happy with this setup!

← Older Post Newer Post →
2 comments
awesome, super helpful, love it
Hey,
Awesome!
Just a beginner question.
I am a bit confused as to how the 8mm rope MBS is 18KNis amplified to the 80KN estimate?
How does one rope with tensile strength of whatever become more strong by using more strands of the same rope?
Wouldn’t the rope break once the MBS if applied to it regardless of how many ropes are in series?
For example if I have a rope rated for MBS 10KN and I put two of them together wouldn’t it break after succeeding the MBS regardless of the amount of ropes together?
If you could provide me with some insight or maybe a good read that would be absolutely awesome. I have no-doubt that this anchor rigged is bombproof, just want to get a better understanding for myself.
Best,
Derek