You have no items in your shopping cart.

A continuation in the 'All About Pulley Systems' series. We go into depth about the connection point for your pulley system. We evaluate the three main ways of connection and the pros and cons of each. Plus an in-depth guide at purchasing a rigging plate for your slackline tensioning system.
Now that we've looked at the Main Pulleys and the Brake for our pulley systems, it's on to anchor methods.There are three main ways to anchor your pulley system to the tree (or master point of your highline): one involves using a separate anchor sling for your pulleys and your brake, another uses the becket of your main pulleys to attach the brake (inline brake method), and the last involves using a rigging plate. There are pros and cons to each, we will look into them below.
Separate Anchors
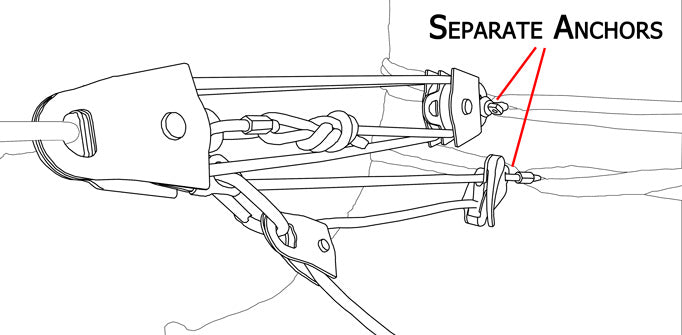
This method of connecting your pulley system to the anchor is unique because it uses separate slings for the main pulleys and the brake. Some of the benefits of this system is that you often have more room in your pulley system because the brake is typically behind the main pulleys with respect to the anchor. This gives more room for the multiplier rope-grab to travel before running into the brake.
Another benefit to this method is that you don't have the problem of having the handle of the brake hit the pulleys when trying to detension. This problem can be quite cumbersome and can lead to detensioning explosions (all the tension lets out at once, not fun). There are ways around this, but not nearly as clean and simple as separating your brake from your main pulleys.
Some of the faults of this method are that it requires a lot of extra gear and weight. You have to remember to bring an extra sling, an extra connection device, and another carabiner for detensioning when using the separate anchor method. Also, while rigging (lowlines, mainly), you have to go through the hassle of making sure both your pulley sling and brake sling are high enough on the tree before you tension the line. This can be a major pain when you are in a rush to get your line up.
Embedded Brake Method
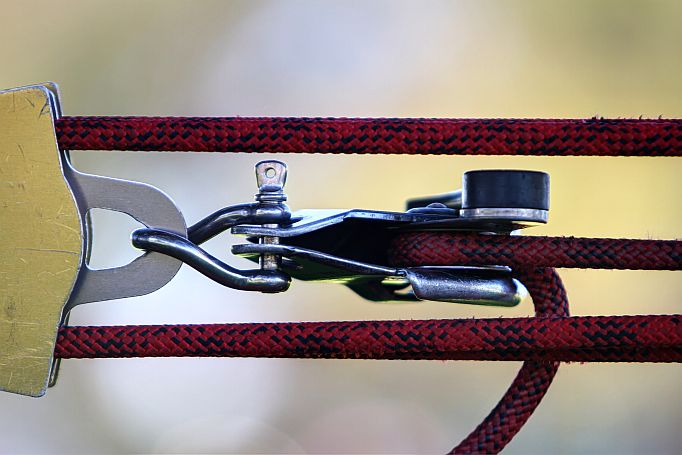
This method of connecting your pulley system to the anchor involves attaching your brake to your main pulleys becket allowing you to directly connect the pulleys to the anchor, bypassing any added components.I really like this method simply because it's the lightest, most efficient, cheapest way to anchor your pulley system. You only have two anchors on your whole slackline using this method, and it's using the least amount of gear possible. There are some big drawbacks to this method though, which give the other methods a slight advantage. The most notable downside to the inline brake method is the added friction, especially with smaller pulleys and larger brakes (i.e. Rock Exotica Machined Doubles and Petzl RIG). When the rope travels through the sheaves of the pulleys, the brake is typically too wide to avoid being rubbed when it's attached to the becket of the main pulley. This can seriously affect the amount of power you can get out of your pulleys when tensioning longer lines. This system is best for highlines where weight is absolutely critical.
Another big drawback to this method is that releasing tension is very difficult, especially with smaller pulleys. The handle of the brake gets lodged beneath the tensioned ropes and is nearly impossible to free when the tension is high. You can somewhat avoid this by using a twisty shackle, as shown in the picture above.
The last and least drawback is that having the brake attached to the becket reduces the amount of throw that can be pulled out of your pulley system. With the knot on one pulley and the brake on the other, you are forced to have at least 2 ft. of pulley system left when you pull all the rope through. This matters the most on highlines where it's a sheer cliff right beyond the anchor and you are leaving the pulley system in the line.
Rigging Plate Method
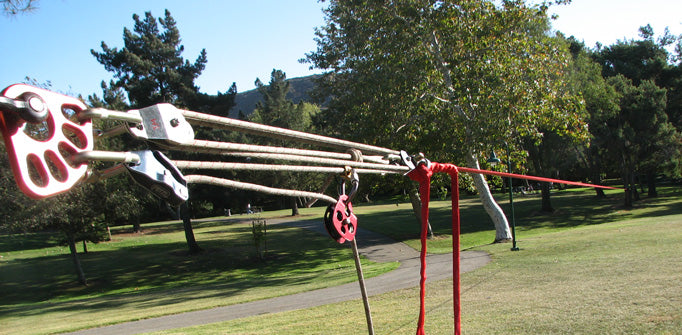
This method involves separating the brake and main pulleys by using a rigging plate. This method is very effective and is my favorite method for anchoring my pulley system.
One of the main reasons I like using this method so much is that it organizes your rigging very nicely. Not only does it separate your brake from your pulleys, it also allows you to connect a second multiplier without adding yet another anchor sling. You can also tie your backup knot for your brake and connect it directly to the rigging plate. You can also use your rigging plate to organize all your gear after you are done derigging.
The only disadvantage that I can see with this system is that it requires another piece of gear (a Rigging Plate). With this rigging plate, you will also need a few additional connectors to connect your main pulleys and brake to the plate. This additional gear will increase the overall weight of your system, but may be worth it for the added spacing within your setup.
With the rigging plate method, there are different plates to choose from and certain qualities to look out for. Here is a list of the main characteristics to keep an eye out for:
- Breaking Strength
- Weight
- Anchor Hole Size
- Rigging Hole Size
- Hole Spacing
- Dimensions
- Length
- Width
- Thickness
- Price
Breaking Strength
As with all of the other components in our pulley system, if you choose to use a rigging plate, it should be strong. Keep an eye out for the minimum breaking strength (MBS), and try and keep that number higher than the MBS of the webbing you are going to be using. For instance, if you are using Type-18, which has an MBS of 27 kN, you should choose a rigging plate with an MBS higher than 27 kN.
Weight
Since we are adding a component to the pulley system that doesn't necessarily have to be there, it's important to be aware of the weight that this component is adding to your overall system. Most good rigging plate are made from aluminum, so the weight isn't substantial, but it's still an important quality to keep an eye out for.
Anchor Hole Size
This quality is very important for a rigging plate because you need to have options for being able to anchor your pulley system. You don't want a rigging plate that can only accept small carabiners because this will limit the types of anchors that you can setup. The bigger the anchor hole, the better. This will give you many many options for anchoring the plate to a variety of connectors (i.e. Shackles, Carabiners, Quicklinks, etc...).
Rigging Hole Size
Most rigging plates will have a number of rigging holes, which are typically all the the same. The size of these holes is very important because this is where you will be connecting your pulleys and brake (and other items in your pulley system). You don't want to be too limited on what type of connectors you can use to anchor your pulley system components with, so the larger the holes, the better.
Hole Spacing
Not only does the size of the rigging holes matter, but their spacing as well. Some rigging plates have sort of a paw shape, where the rigging holes fan outwards, and some rigging plates are long and have many many holes. The fan shaped plates typically have a nice spacing between the holes that allows you to have a nice gap between your main pulleys and your brake, which is the main reason why we would use a rigging plate for our pulley system.
Dimensions
Besides the above dimensional aspects, there are general dimensions that are of concern with rigging plates. This includes overall height, width, and thickness. Below is a picture showing these various dimensions for reference.
Price
The last characteristic to be aware of when purchasing a rigging plate is, of course, the price. Once again, you get what you pay for. Higher priced rigging plates tend to have the above characteristics optimized and will typically work a lot better than the lower priced rigging plates. Be sure to evaluate each of these characteristics when choosing your plate though, do not be fooled by a high price alone.

← Older Post Newer Post →
0 comments