You have no items in your shopping cart.

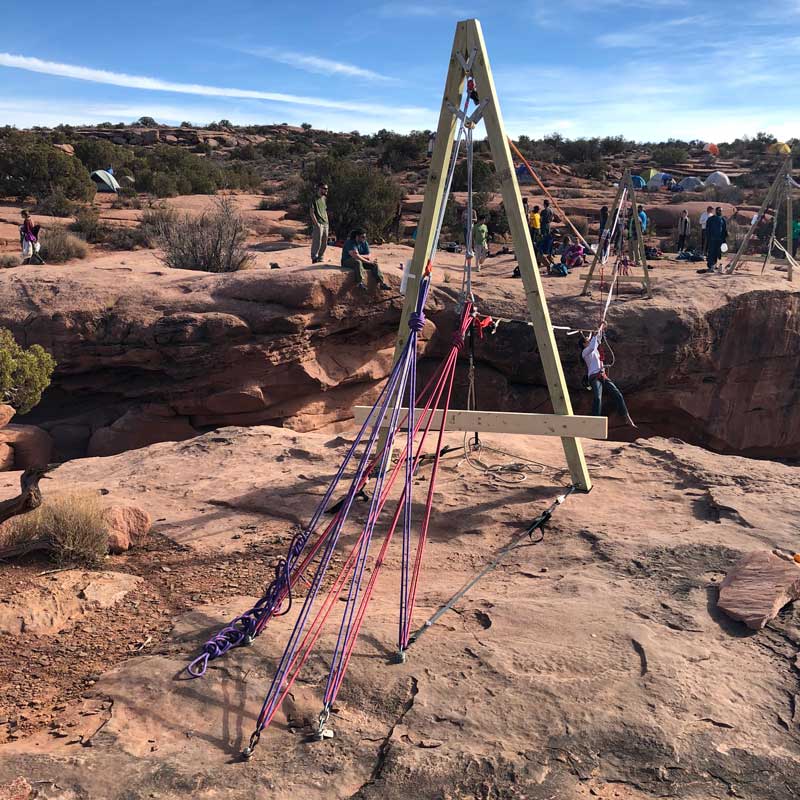
An overview of the rigging of GGBY 2017. We used A-Frames for all the lines with a unique structure plus consistent anchoring for every anchor. A lot of cool techniques were used this year and we wanted to share them with you.
In this article, we will be discussing the preparations of the gear and the rigging of GGBY 2017. This year was the first year that this festival was run in an official manner with permits and insurance as well as standardized rigging. I won't go into the logistics of why the festival has turned into an official event as there are many details and that is not the aim of this article. You can find out that sort of information and more at http://www.ggbygathering.org/ and http://slackline.us/ggby/.
Scouting and Planning
In the beginning of the planning phase of the festival, Sonya Iverson, President of Slackline.US, who was running the event this year, asked me, Jerry Miszewski, to take lead on the rigging of the festival. I saw this as a fantastic opportunity to show some new rigging techniques as well as increase the safety of the rigging at the festival. Over the course of the previous 9 GGBY's, I had attended 6 of them and had started to notice a trend. The rigging was starting to become sub-par and at times, unsafe. I saw this as a problem for such a large festival with such a big impact on the slackline community. I wanted to change this.

The first thing that I did was schedule a scouting mission to The Fruit Bowl so that I could acquire all the information about the area with photos of all the anchors and exact line lengths. I wanted to have this information so that I could properly plan the equipment ahead of time to make rigging on-site super quick. This also gave me the opportunity to see what anchors were in need of work to make them safe. For those of you that have never been to The Fruit Bowl, the anchors on most of the highlines are very far back from the edge, up to 14m from the bolts to the lip. This is in part due to the rock quality at the location as well as allowing for all rigging to take place behind the edge, which was the style back when most of the highlines there were established.
This style of anchoring does not do well with modern rigging techniques where we like to have our weblocks out over the edge and the tensions of our lines relatively low. It creates a massive abrasion risk for a good section of the line from the anchor to the lip. One way that this was mitigated was the addition of stabilizer bolts near the lip of the lines. A stabilizer bolt is a bolt that is inline with the anchors that can be used to pin down the line as it exits the lip out into the void. This prevents large-scale abrasion movements that can occur during dynamic movements on the line, such as surfing, or leash falls/catches. Most of the anchors at The Fruit Bowl have stabilizer bolts. The ones that didn't do now after some bolting work that took place at GGBY this year.

Preparations
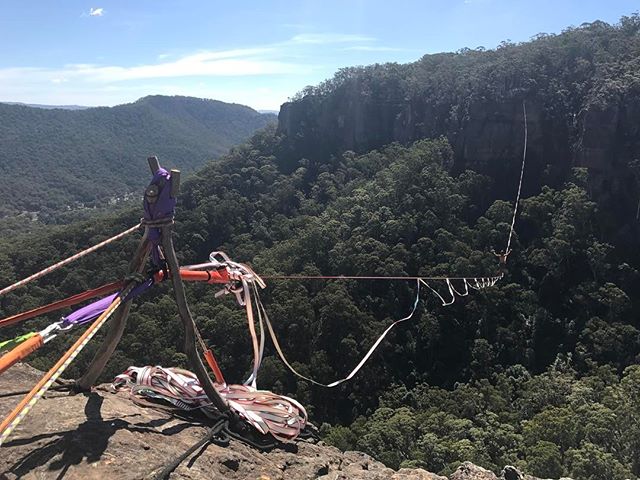
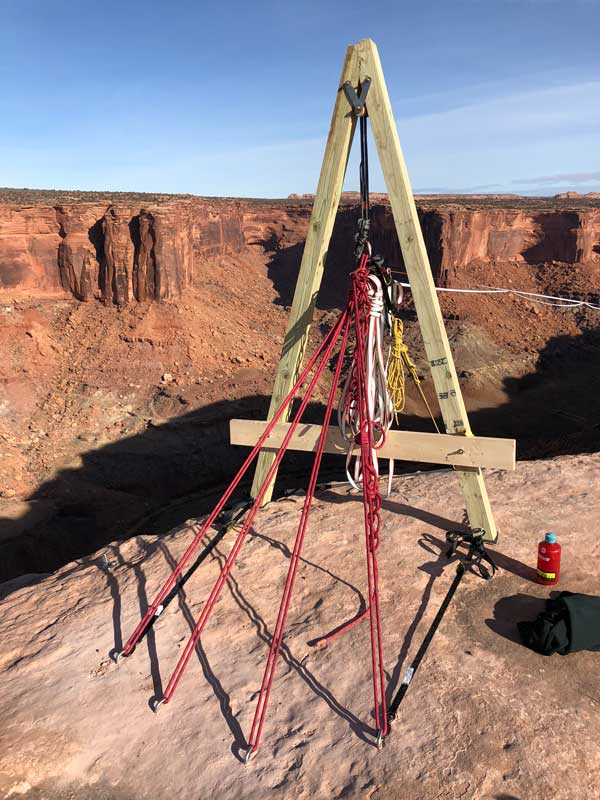
Once I gathered all the data for the anchors in The Fruit Bowl, it became clear that the cleanest and easiest way to make all the highlines safe would be to rig them with A-Frames. Earlier in the year, I had tried out a new type of a-frame that I hadn't seen before: the hang-frame. We rigged a 400m highline in Australia using some strong sticks we found and hung the load beneath the head of the a-frame. This gave the load a bit more freedom of motion while stabilizing the frame further. A small motion in the line would not cause any movement in the frame because of this freedom of movement. Bradley Duling took this idea to a whole new level and designed a really cool way of building these types of frames using a set of steel plates to form a hinge as well as several precision cuts on wooden legs.
I decided that this style of A-frame would be ideal for GGBY 2017. So I decided to start working with Bradley on the design and testing it extensively in my warehouse. After close to 40 hours of testing and several design iterations, I came to a pretty cool design that I was satisfied with and would eventually use at GGBY. This is where the real work began.
At the moment, I live in Chicago. This is a long ways away from Moab, Utah, about 1,362 miles (2,191 km). If I made the a-frames in Chicago at my warehouse, it would mean I would have to drive them to Moab (a 24 hour drive). I could always make them in Moab, but I wasn't sure if the right tools would be available, nor was I certain how much time it would take. I decided to commit to driving and starting to make the frames in Chicago and drive them out to The Fruit Bowl for the event.
I won't go into too much detail about the building of the frames and the overall design as I will be doing a separate post about that. However, it took about 80 hours to organize, measure, cut, screw, mark, assemble, and load into the van the legs and crossbeams for the Hang-frames as well as 6 additional hours of assembly when we arrived to GGBY. We had 12 highlines rigged at the event, with 11 of them on Hang-Frames. I built 28 frames, just in case we needed extras (which turned out to be a good idea). They all turned out fantastic and worked quite well at the event.
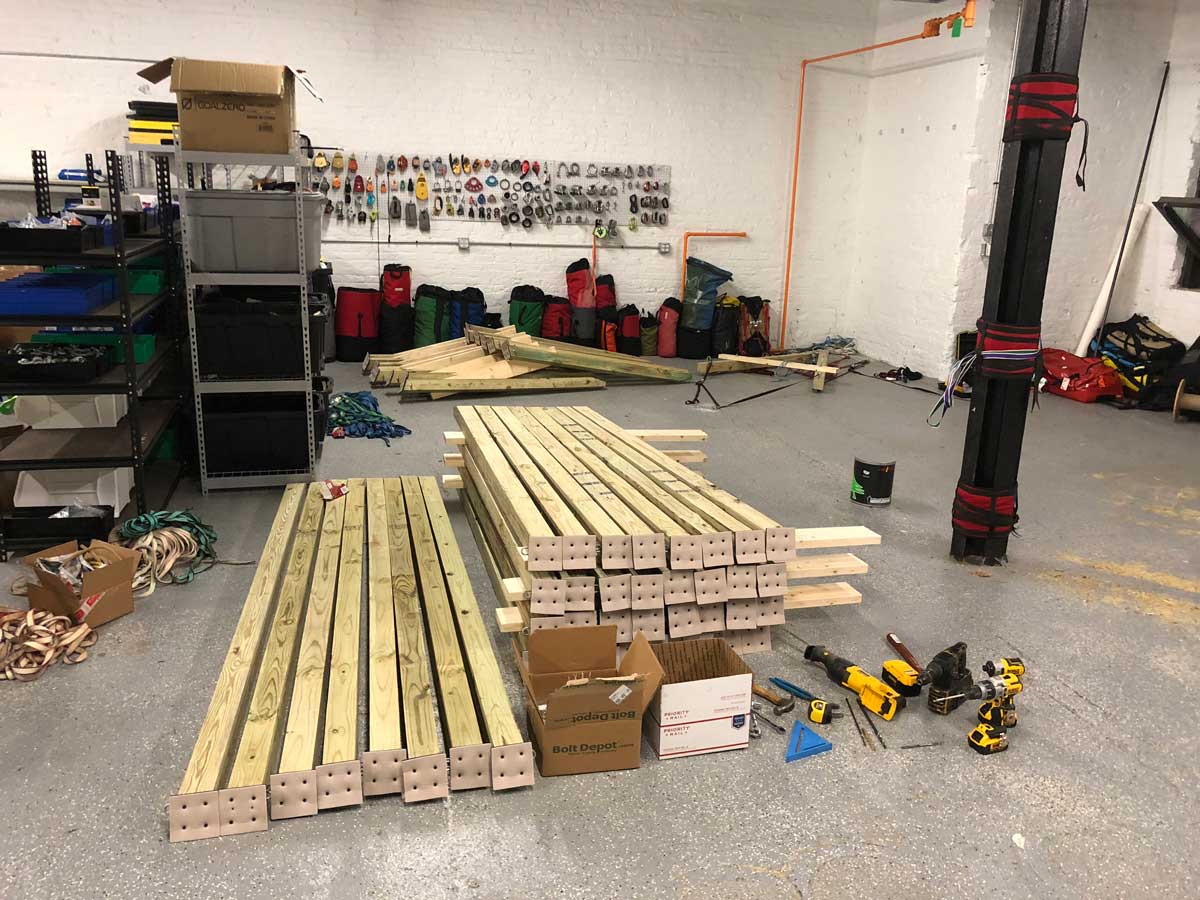
In addition to building the frames, I also measured, cut, marked, and organized all the gear for the anchors. Each anchor had a separate bag that was labeled and sorted. This proved to be absolutely amazing for rigging as we could just drop each anchor bag at it's destination and the rigger for that line knew that they had everything they needed to rig that anchor. Although it took a considerable amount of time ahead of the festival to do this organization, saving time on-site means a whole lot more than saving time ahead of the event. I highly recommend this approach for projects or day-to-day rigging when possible.
The Hang-Frames
For brevity's sake, here is a small description of the hang-frame design:
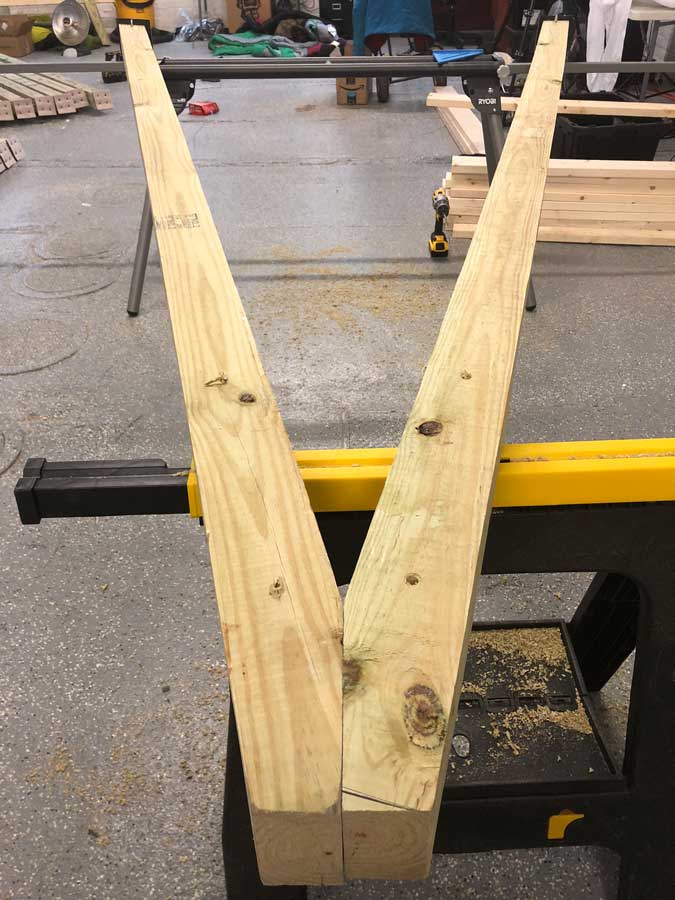
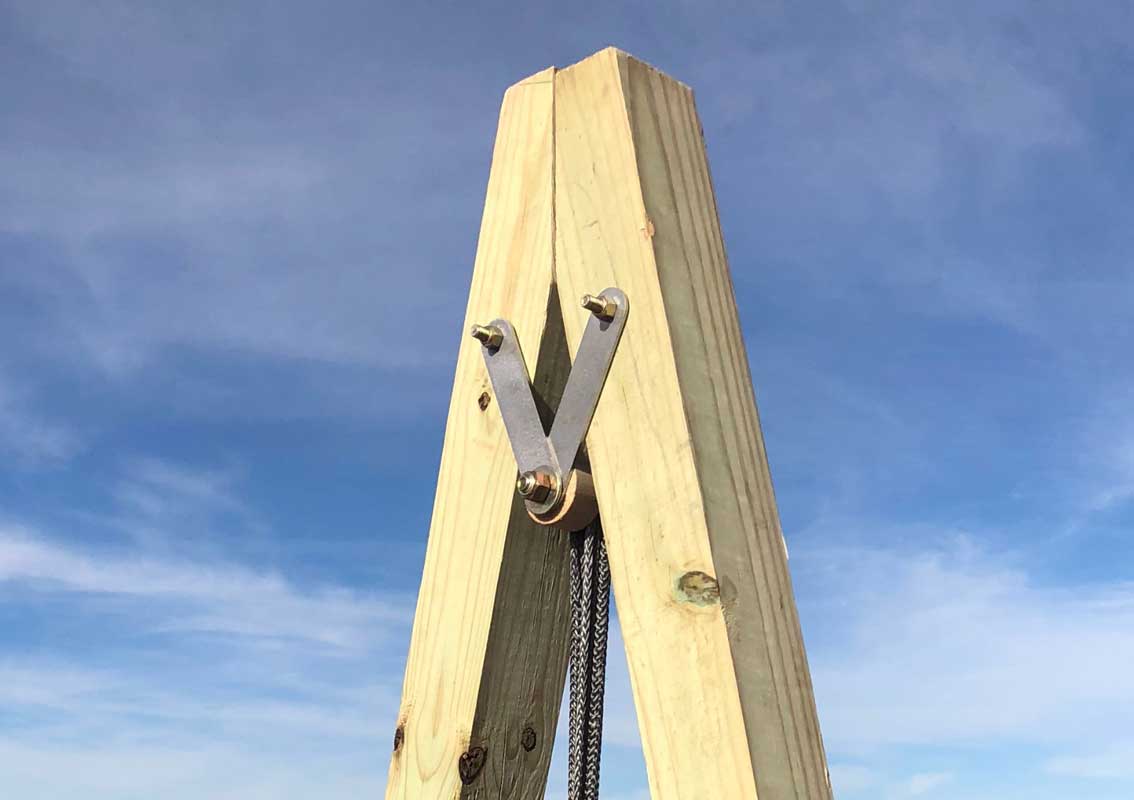
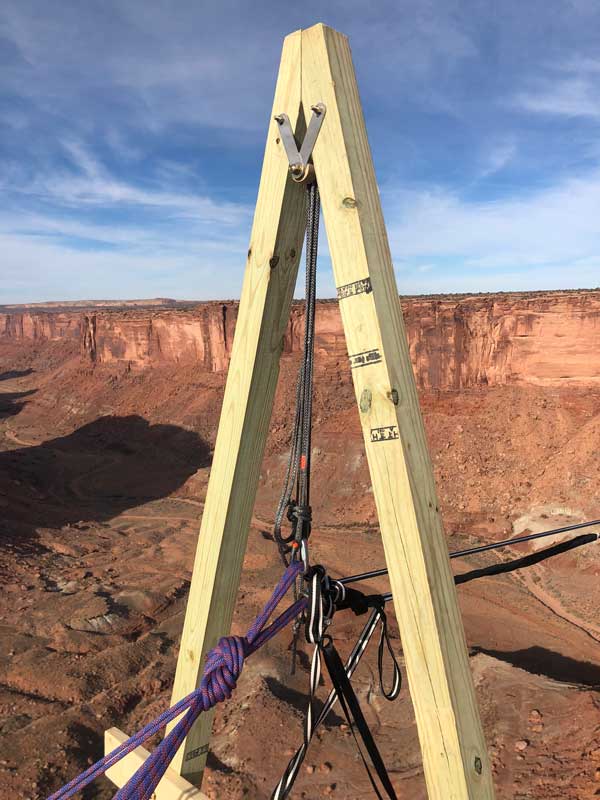
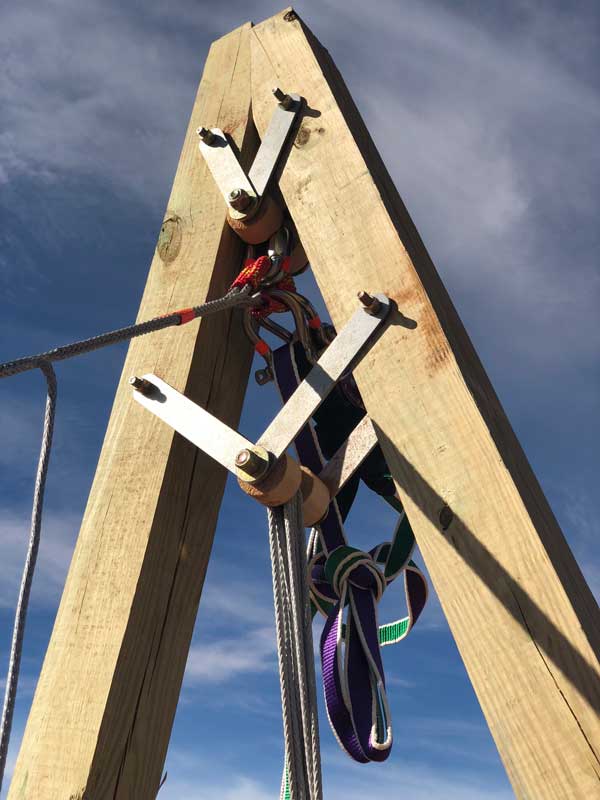
We used 4x4 beams (8.9 x 8.9 cm) for the legs of the frames, in 3 different heights: 6 ft (1.8m), 8 ft (2.4m), and 10 ft (3.0m), and 2x6 beams (3.8 x 14.0 cm) for the crossbars. The tops of the 4x4's were cut at either a 15-degree or 20-degree angle, depending on the height. These angled beams meet in a flush manner. Near the top of the legs, a 3/8" (10mm) hole is drilled all the way through the legs, where we passed a 3/8" bolt through. On the outside of the legs we would have a custom-designed plate made from 4130 steel. The entire head of the frame had 4 of these steel plates and they all meet at a point between the two legs, a few inches below where they meet. The steel plates formed a type of hinge, which also aids in the storage of the frames, which I will discuss in the other article. There is a 1/2" (12.7mm) bolt that passes through all 4 plates where they converge, called the "hang bolt". This is where we would hang the line from, described in further depth below.
Before I go into how we rigged with the frames, there is one other thing that I want to discuss first:
Another aspect of the rigging that I was adamant about was consistency in the anchors. I wanted every anchor to be roughly the same so that the rigging team could easily inspect every line with as little effort as possible during the event. I decided to go with BFK (Big Friendly Knot) anchors with some lines using whoopie slings to extend these anchors out to the A-frames, which were positioned at or near the lip. The BFK's were built using 11mm BlueWater Dynamic rope. I decided to go with dynamic rope for the anchors for two main reasons:
Better Equalization - One of the things that I don't like about BFK's is how hard it is to properly equalize the anchor points. Due to the drastically higher elongation of dynamic rope, this would not be a problem as the master point would stretch more, causing all legs to engage at base tension on the lines.
Better Dynamics - A big problem we've had in the community on short highlines is the excessively high forces people experience on leash falls. Having dynamic rope in the anchors gives us another avenue of force dissipation during dynamic events such as a leash fall or catch. This combined with a strict "all-nylon" rule for the sub-40m highlines proved to be amazingly effective.
Anchor Rigging
The way that we would rig every anchor is as follows:
Thread the dynamic rope through all points. Every anchor had between 4-6 bolts, which were either Terry-style bolts or a new Glue-In bolt that will soon be replacing all bolts at The Fruit Bowl.
Pull all strands together and find where we wanted the master point to be. We made sure to leave the ends of the rope unconnected in the beginning to make adjustments easy. We also were sure to keep the rope ends on one of the outer legs for easy access. Props to Zac Timmons for showing me this method, super cool!
Form a Figure-8 BFK with all loops of the anchor. I chose to go with a figure-8 because it's easy to inspect and usually ends with a correctly-oriented knot. An overhand-BFK usually leaves the master point oriented horizontally, which poses a problem for most rigging styles.
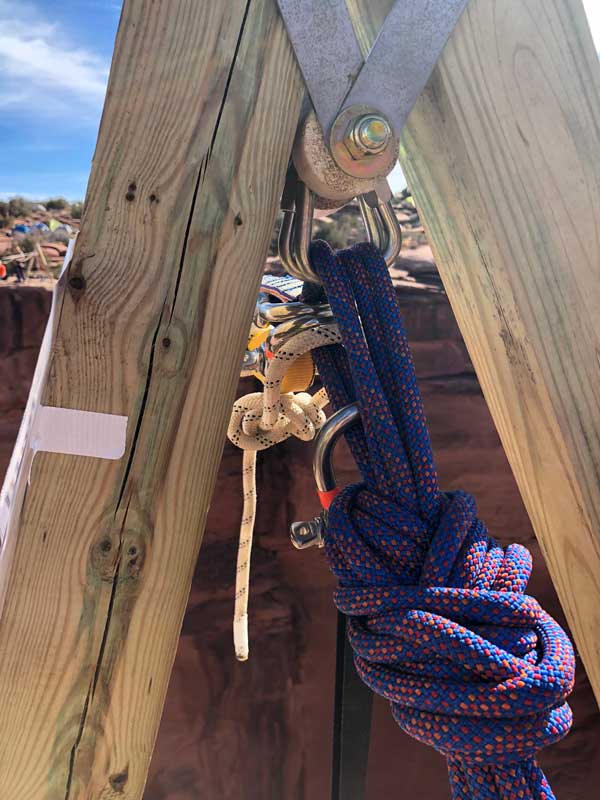
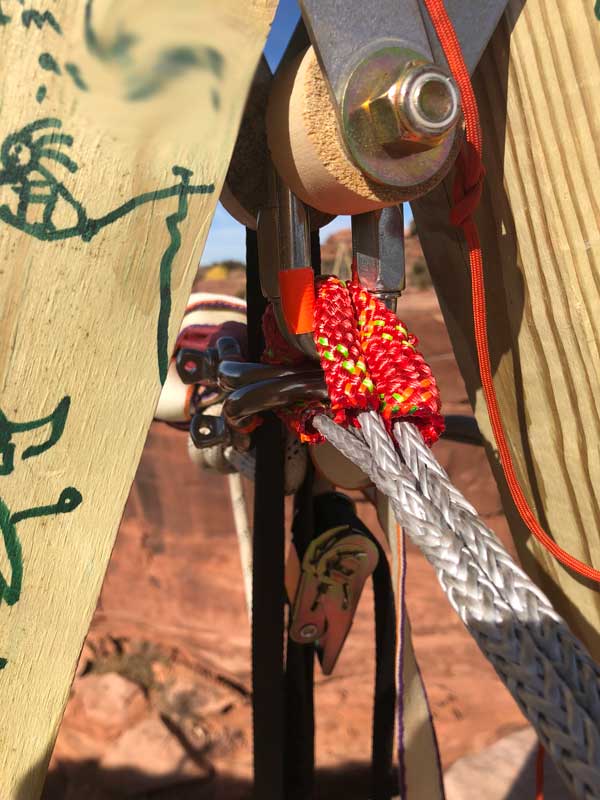
If the anchor was close enough to the lip, we would connect the BFK straight to the hang bolt on the hang-frame. We did this by using 2 opposing delta quicklinks, with the wide end connected to the master point and the narrow end connected to the hang bolt.
If the anchor was too far to do the above, we would use a pair of what I called "extension whoopies", which are just whoopie slings that have a protective sheath on both the adjustable end and the fixed end. We used a pair of opposing delta quicklinks connected to the master point with the wide end on the BFK loop and the narrow end connected to the adjustable end of the whoopie slings. The fixed end would connect to the hang bolt with a pair of opposing oval quicklinks.
Then, we would connect a pair of shackles to either the BFK loop or the fixed loop of the whoopie slings, where we would either connect our sewn loops on the webbings or the weblocks for the tensioning side.
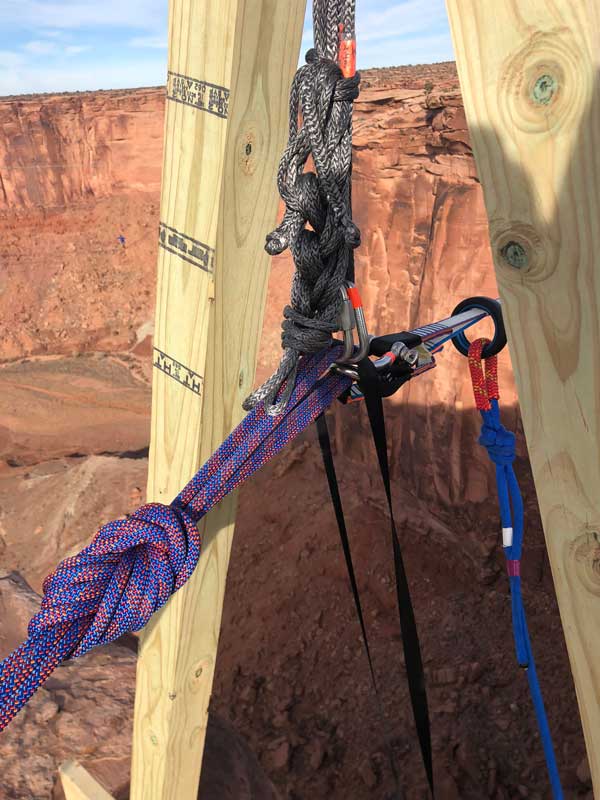
We used 3 different heights of hang-frame at the festival this year: 6 feet (1.8m), 8 feet (2.4m), and 10 feet (3.0m). Depending on how high the line needed to be, we sometimes used another set of whoopie slings that we hung from the hang bolt. We would pass these whoopie slings directly over the hang bolt and connect both ends to a set of opposing delta or oval quicklinks (depending on if there were extension whoopies or not). These whoopies were called "hang lines". These hang lines gave us the ability to alter the height of the line throughout the festival, if needed. It also allowed us to achieve level-ness on some of the off-level lines that are in The Fruit Bowl.
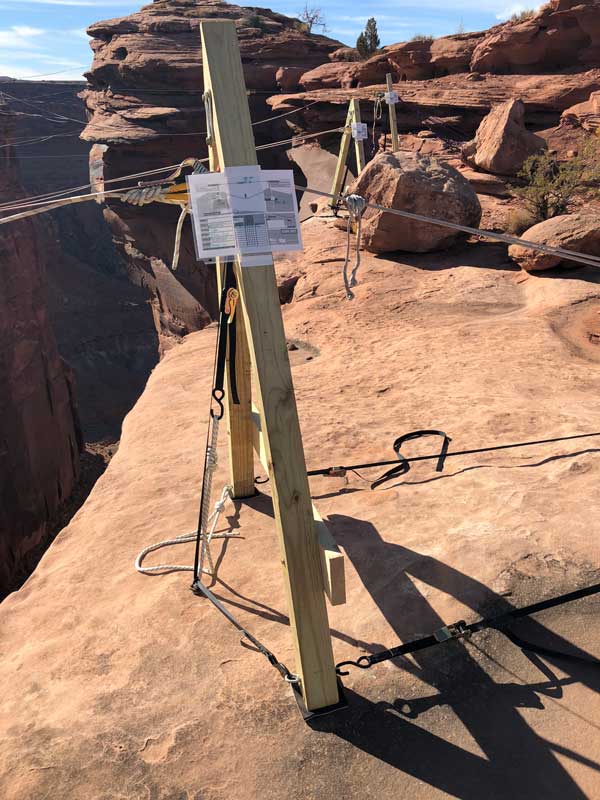
One thing that is critical with the hang-frame (and a-frames in general) is that the feet need to be stabilized. Without this, the feet have the ability to "walk", or move away from their original location. To fix this, we used a set of 3 stabilizing ratchet straps per frame. One would be used for each leg going back to the outermost bolt: the left leg would go to the left-most bolt and the right-leg would go to the right-most bolt. The third ratchet was used to stabilize the feet in the front direction. We would connect it from one leg, pass it through the stabilizer bolt that every anchor has and then on to the other leg. When these three ratchet straps were tight, the frame couldn't move...so I thought.
Throughout the festival, we had some issues with the frames moving more than I had anticipated. I found that there was not enough downward force being applied to the frames, mostly due to the large distance between the anchor and the frame and the relatively low angle between the anchor and the line caused by that distance. To fix this issue, I reconfigured the front ratchet strap to run from one leg, through the stabilizer bolt, up to the bfk or extension whoopie, then back to to the stabilizer bolt, and finally to the other leg. When tension was applied to this, the frame would be pulled down and also would be stabilized in the front. This proved to be quite effective. I changed all the anchors to this style after seeing how well it stabilized the frames.
Here is a video that I made for the rigging team showcasing some of the details of the rigging:
Overhead Lines
After a brilliant suggestion from Daniel Tulberg, I decided that we would rig two of the smaller highlines with an overhead line that people could tie into or use a hand line on. The rigging of these lines was super interesting!
These two lines, which were 47 feet (14m) and 63 feet (19m) long, used a 10 foot (3.0m) hang-frame that had a slightly different design. These frames had two hinges stacked on top of one-another, each with their own hang bolt. The upper hinge was used for the upper line and the lower hinge was for the lower line. We rigged both the upper and lower lines using the same set of bolts, but each with their own anchor rope. The lower line used no extension whoopies, but the upper line had a set of extension whoopies, due to the anchor needing to be a bit longer. We connected the anchor for the upper line directly to the top hang bolt. The lower anchor was connected to a pair of hang line whoopie slings that were hanging from the lower hang bolt. This was so we could control the distance between the two lines and also play with a safe height for the lower line.
These two overhead-leash highlines were a HUGE success! So many people got to go out on a highline who were previously not willing to. We also were able to use the upper line for stringing lights across for night highlining.
Tape
Another thing that I wanted to try at this festival was a better taping solution. We've been seeing a lot of damage in the last couple of years that has arisen due to mainline and backup line interactions. I've noticed that most of these incidents occur after a large number of the tapes on a line break. This got me thinking that a stronger tape might be a good solution to preventing these types of critical damages from occurring. So, I found 5 different tapes that all have massive breaking strengths. All 5 of them break at above 100 lbf (45 kg), with a few of them breaking in the 200-300 lbf range (90 - 135 kg).
I taped all of the 11 highlines that I prepared ahead of time (the 12th highline was rigged by a group of festival participants) with one of these 5 tapes to test how well they worked. The results were quite amazing as we only had a handful of tapes break throughout the 5 days that the lines were rigged. This was after non-stop usage on all 11 highlines, with the shorter lines seeing easily over 100 whippers each, a lot of which were on or near a tape. I found one that I preferred the most and will be doing more testing with it in the coming weeks. Expect another article on that subject soon as well.
Post Festival Information
During the festival, several things came to light about the rigging that have required me to take a step back and rethink how we can make it better for future events.
First, the a frames posed an interesting dilemma. They were, themselves, a single point of failure within the highline system. Arguably, they were drastically overbuilt, but it still was a single component that could cause complete system failure, which was something that irked me throughout the festival. If a frame or part of a frame were to fail, unprotected rope, webbing, or dyneema would slam against the sandstone rock, interacting with the edge and the stabilizer bolt. This would most certainly cause further damage to the rig, likely leading a near or complete system failure. Yikes. I need to change this.
To fix this issue, we will have large crash pads resting on the top of the cross bar of the a-frames and extending out to the edge of every anchor. I also plan to investigate some changes to the hinge on the frame to make it less sharp and less harmful to any of the soft components in the event of a frame failure.
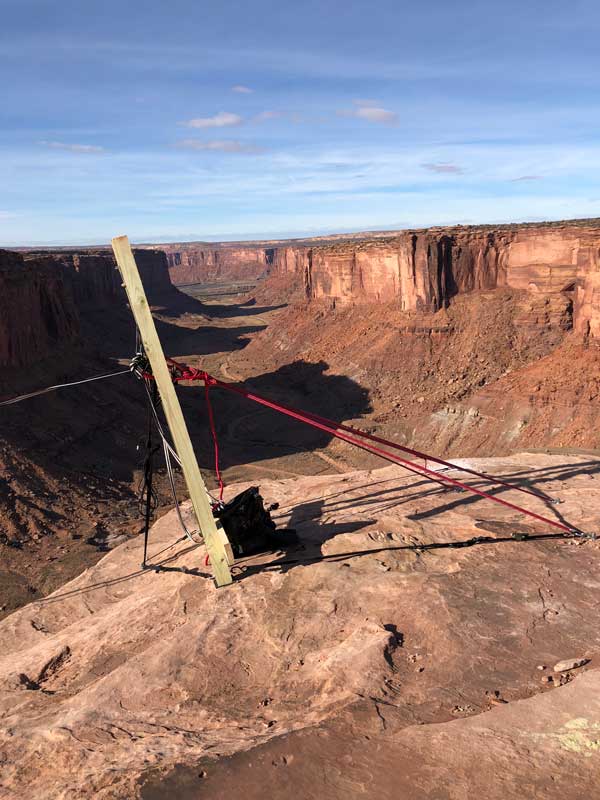
We also had some issues with the dynamic rope on the highlines. We underestimated how much the anchors would settle after being under tension for such a long period of time. This settling caused a lot of the a-frames to start to lean forward more than we were comfortable with. This combined with the extremely laborious process of altering the anchor made for a very unpleasant time of fixing lines.
To fix this, I do not want to change the dynamic rope as I feel the benefits, especially on the shorter lines, far outweigh the inconvenience of fixing the anchors. However, the way that we were attaching the dynamic rope to the a-frames was the primary cause of this difficulty. Since we had quicklinks going straight from the BFK to the hang bolt, it made it especially difficult to alter anything with the rope. For next year, I plan on making a change to the frames that will allow the anchor rope to be easily disconnected from the frame and changed if need-be. I will go over the details of this change in the Hang Frame post, but it's a very simple change that could cut the time down to 1/10 of what it is with the current design.
Also, an easy way to fix this will be to plan for this settling in the anchors. We can start with the frames leaning back slightly, knowing that they will flex forward throughout the festival.
On the topic of the dynamic ropes, we also experienced some strange movements on some of the larger lines, that I partially attribute to the use of dynamic rope. I believe the benefits of having dynamic rope stop being so significant once the lines become longer than 130 feet (40m). Beyond this length, I think static rope will be a better choice. It's these lengths that you want to have the dynamics of the webbing be the primary feel in the line rather than the anchors. So I will be implementing static rope anchors for the 40+m gaps. However, everything in the classic Fruit Bowl area will remain on dynamic rope anchors.
Another attributor to these strange movements we experienced on some of the longer lines has to do with how the frames were rigged. On a few of the lines, we used 8 foot tall frames with whoopie sling hang-lines. When a hang line was used, there was a LOT of potential side-to-side movement possible within the frame. What would happen is a walker would make a mistake, sending a surf motion through the line. Usually the backup loops combined with a stable anchor dissipate these types of movements and allow the line to remain stable. However, since the anchor was able to move side-to-side, these surf motions were actually being propagated! They would come back to the walker stronger than they left. It was such a crazy feeling that i've never had on a big highline before. It was especially noticeable on the new 900 ft (272m) line that many people struggled with.
To fix this issue, I have three solutions: first is to use a shorter a-frame for these lines and go straight to the hang bolt instead of having a hang line. This will drastically reduce the potential side-to-side movements within the anchor while still allowing enough height to be safe. Second, we can continue to use the tall anchors, but just steepen the angle of the anchor and go straight to the hang bolt, which will actually put more downward force on the frames, which is ideal for further stabilizing. The third solution would be to install ratchet straps from the hang point (end of hang line where the anchor is attached) to both legs to stabilize it in the lateral direction, preventing any side-to-side movement. I need to test this concept, but I think it's fairly promising.
Another issue we had was not having enough downward pressure on the frames, which would cause them to want to move quite a lot during dynamic events. I already implemented a change that worked at the festival by applying a ratchet strap going straight down to the stabilizer bolt. However, I want to optimize this as well, and it will tie-in directly with the change above with having the anchor be independent from the frame.
Lastly, we also had a few small issues with the spacers I used on the hang bolt to center the load. This had to do with how we originally setup the downward-pulling ratchet straps in the beginning and was easily fixed later. However, I will also be implementing a change to these in the future to a more solid material, which will be outlined in the hang frame article as well.
About GGBY
Just some info about the lines and rigging team.
We had 12 highlines rigged, 11 of which were rigged by the GGBY rigging team, which consisted of the following individuals, whom I want to send a huge thank you to for the incredible amount of work and effort they all put in to make this festival awesome:
- Rafael Bridi - A special thanks to this guy, he helped a ton with the transportation of the frames from Chicago to Utah. Such a great guy and a huge asset to the rigging and Balance Community team.
- Friedi Kuhne
- Spencer Seabrooke
- Mia Noblet
- Matthias Brunner
- Doug Main
- Dakota Collins
- Zac Timmons
- Greg Fishell
- Mauro Poletti
- Dany Schmidt
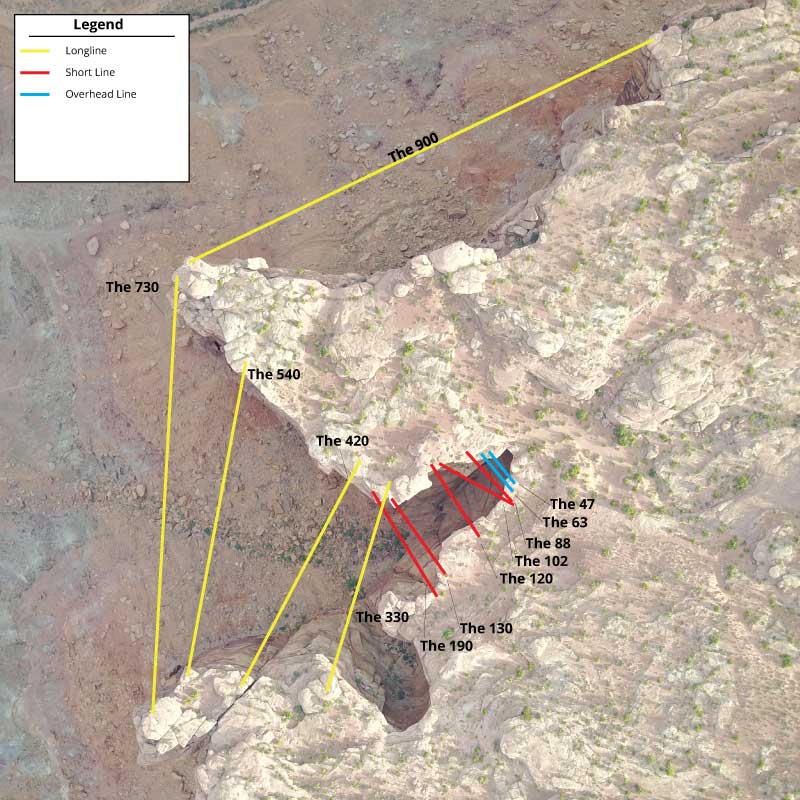
These were the lines that were rigged, along with information about each:
- The 47 - 47 feet (14m) long, rigged on double Lift
- The 63 - 63 feet (19m) long, rigged on double Type 18 MKII
- The 88 - 88 feet (27m) long, rigged on Lift main with 10.5mm static rope backup
- The 92 (Wet Beaver) - 92 feet (28m), rigged on double Type 18 MKII, rigged by festival participants
- The 102 - 102 feet (31m) long, rigged on Lift main with 10.5mm static rope backup
- The 120 - 120 feet (37m) long, rigged on PinkTube main with Half Marathon backup
- The 130 (Dean's Line) - 130 feet (40m) long, rigged on double SkyPilot
- The 190 (Big Melons) - 190 feet (58m) long, rigged on double Lift
- The 420 - 420 feet (128m) long, rigged on Lift main with Aero 2 backup
- The 540 - 540 feet (164m) long, rigged on Unicorn main with Feather PRO backup
- The 725 - 725 feet (221m) long, rigged on double SkyPilot
- The 900 (Real Shit Show) - 900 feet (274m) long, rigged on double Feather PRO
More Resources
You can view more information about The Fruit Bowl highlines at the following map, that is constantly being updated with new details about the highline area: https://drive.google.com/open?id=11ZEvWo5nZ1wfE8KHshqAQIcbh9fMK5ya&usp=sharing
I would also recommend joining The Fruit Bowl Facebook group to keep up to date with improvements and see any news about the highline area: https://www.facebook.com/groups/257080718157988/
That's all I have for now. Please feel free to ask any questions below and I will do my best to answer.
A huge shoutout to all the participants this year. Without you guys, this festival couldn't happen. Great work everyone and hopefully see you next year!

← Older Post Newer Post →
0 comments